
Docker (1): Introduction

Docker is a containerization application that allows you to deploy software, along with environments and deploy it on another device. I.e. OS/Application-level virtualization. This allows us to create an isolated environment without the need to create a new virtual machine, making them lightweight and efficient.
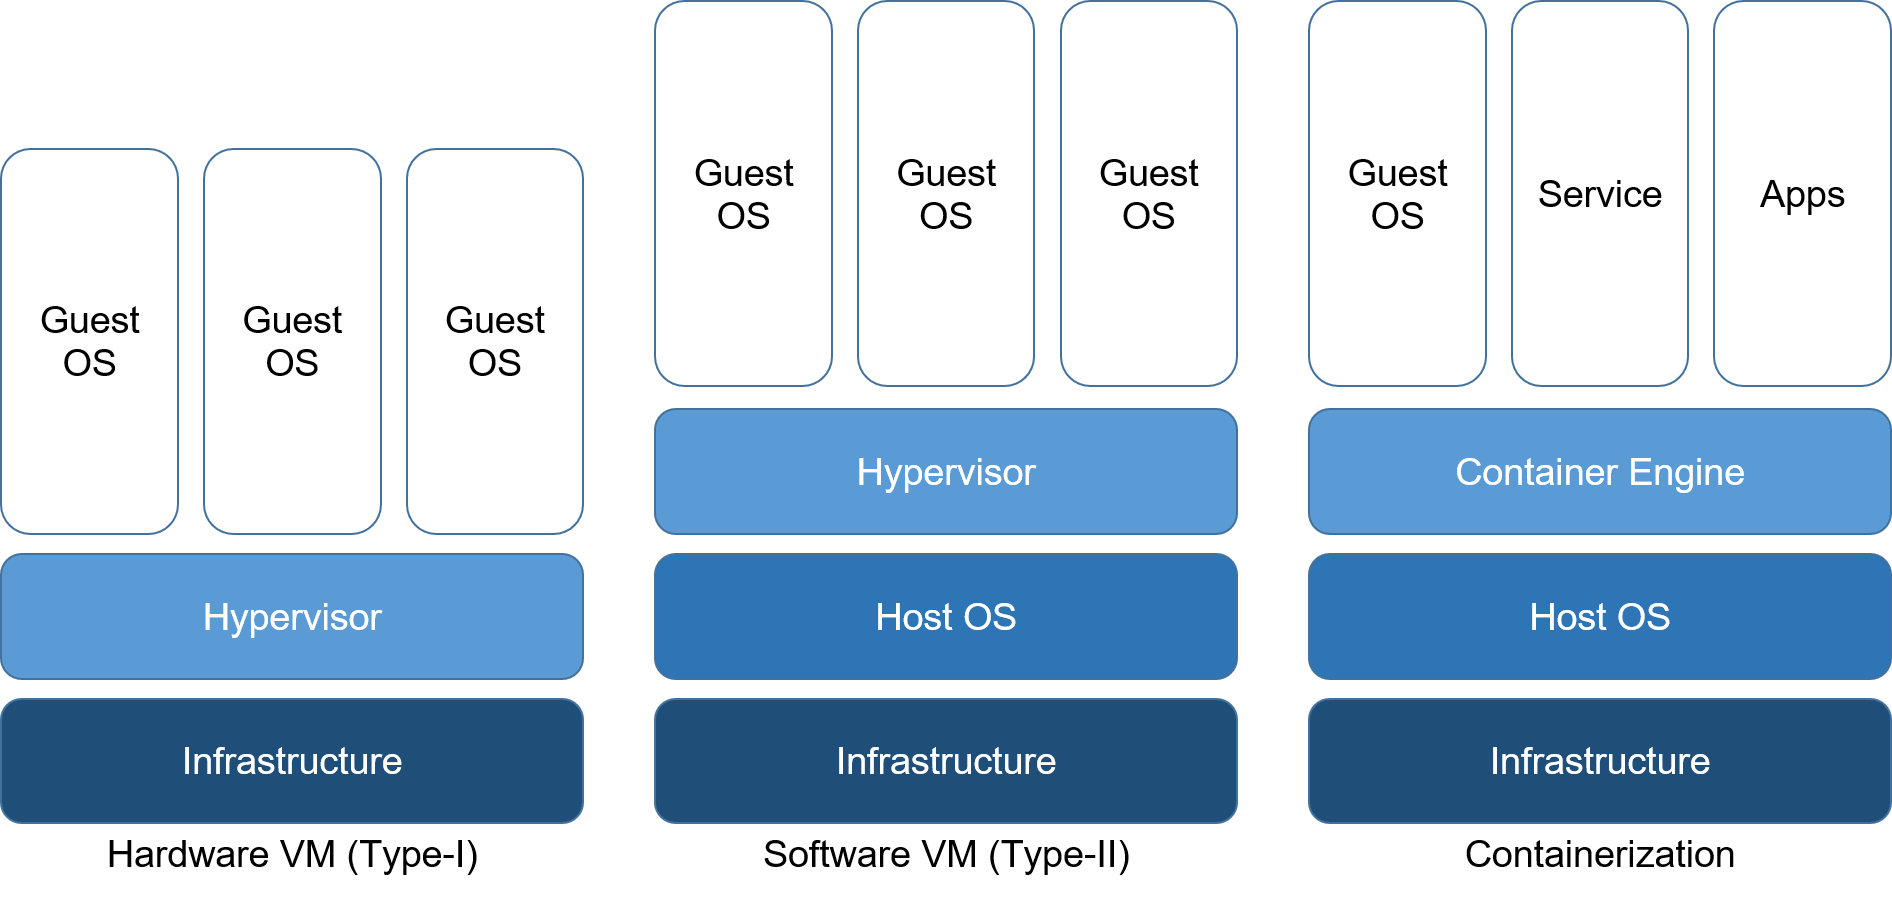
The way docker does this is by through the docker daemon dockerd and the daemon communicates with the OS via a socket (default: UNIX). Think of it as the hypervisor of a virtual machine. This however does not allow us to install a different OS with a different kernel. So, no Windows on Ubuntu, but you could install Ubuntu on Windows because of WSL. The following image gives you a visual concept between the differences of Containers and VMs.
Before we dive in lets first familiarize ourselves with certain terms that would frequently come up when using docker and their VM counterparts if any.
dockerd: Daemon (host) that communicates with the infrastructure (using a UNIX socket by default) manages docker objects such as:- Image: Template for container, like an
.isofile. - Containers: A running instance of an image, like a virtual machine.
- Volumes: A dedicated filesystem for the daemon.
- Network: A dedicated virtual switch for inter-container or host networking.
- Image: Template for container, like an
docker: The client (CLI) for running commands (communicating with the host) based on Docker Engine API.Dockerfile: Blueprint for creating images.docker-compose: A software for defining/running multiple containers.
Getting Started
This installation method assumes that you are running on Ubuntu 20.04. Although docker is most likely to be in your software manager, Docker suggests installing the newest release (docker-ce) as follows.
# Install dependencies
sudo apt-get install ca-certificates curl gnugp lsb-release

# Add GPG key for Docker apt package
curl -fsSL https://download.docker.com/linux/ubuntu/gpg \
    | sudo gpg --dearmor -o /usr/share/keyrings/docker-archive-keyring.gpg

# Add to apt source list
echo "deb [arch=$(dpkg --print-architecture) \
      signed-by=/usr/share/keyrings/docker-archive-keyring.gpg] \
      https://download.docker.com/linux/ubuntu $(lsb_release -cs) stable" \
      | sudo tee /etc/apt/sources.list.d/docker.list > /dev/null

# Install docker
sudo apt-get install docker-ce docker-ce-cli containerd.io

# Uninstall docker
sudo apt-get purge docker-ce docker-ce-cli containerd.io
Since the daemon communicates with different daemons using a UNIX socket, root access would be required to perform requests. Upon installation, a docker group is created to allow a non-root user to use docker.
# Grant user docker privileges
sudo usermod -aG docker $USER
Running your first Docker Container
The main command for running a docker container is:
# Run docker container
docker run --name [NAME] [FLAG] [IMAGE]:[LABEL] [COMMAND]
Let's try out a couple of examples for running containers. We could run a Ubuntu container as follows.
# E.g. Running Ubuntu
docker run --name ubuntu_tc -it ubuntu:20.04 bash
This command does the following:
- Find
ubuntu:20.04image locally orpullfrom registry (Docker Hub) creates container- Allocate volume and create network interface
- Execute
bash, run iteractively-i, attach to terminal-t exitorCtrl+cto terminate shell, or detach usingCtrl+Shift+p,Ctrl+Shift+q
Other flags include:
-ddetach and run in background-pmap port<HOST>:<CONTAINER>-vmount host filesystem to container<HOST>:<CONTAINER>
# E.g. Running Nginx
docker run --name nginx_tc -d -p 8080:80 -v /path/to/dir:app/ nginx
Now that you've run your first docker container, we would go through other commands in the next post.